Saturday, November 19, 2011

Golden Cinnamon-Pumpkin Bars

Sorry, no picture of these right now...just the recipe to make an incredibly delicious treat!  Two different people tasted these when I made them, and both asked me for the recipe.  This recipe is another from the King Arthur Whole Grain Baking cookbook.  Here it is, straight from the book:

Yield: 2 dozen
Baking Temp: 350 degrees
Baking Time: 40-45 minutes

These moist, spicy bars are the deep gold color of burnished copper and look lovely on a dessert buffet.  They're similar to brownies in texture, but are a nice change from that ubiquitous chocolate treat, particularly in the fall, when the flavor of pumpkin seems especially apropos.

3/4 cup unsalted butter
1 1/3 cups packed light or dark brown sugar
1 tsp. vanilla
3/4 tsp. baking powder
1/2 tsp. salt
2 tsp. cinnamon
3/4 tsp. ginger
1/4 tsp. cloves
1/4 tsp. allspice
1 egg
1 cup canned pumpkin (not pumpkin pie filling)
1 1/2 cups traditional whole wheat (this means red wheat, but I used white whole wheat flour--worked fine)
1 cup cinnamon chips (I used chocolate chips instead, which worked out well)
1 cup loosely packed golden raisins or dried cranberries (I omitted these)

Preheat the oven to 350.  Lightly grease a 9X13-inch pan.

Melt the butter in a medium microwave-safe bowl or in a saucepan set over low heat, then add the sugar and stir to combine.  Return the mixture to the microwave (or heat) briefly, until it's hot and starting to bubble.  Transfer the mixture to a medium bowl and allow it to cool till you can comfortably test it with your finger.

Beat in the vanilla, baking powder, salt and spices.  Add the egg, beating until smooth and scraping the sides and bottom of the bowl.  Stir in the pumpkin, flour, chips and dried fruit, mixing thoroughly.  Spoon the batter into the prepared pan.

Bake the bars until a sharp knife inserted into the center reveals moist crumbs, 40-45 minutes.  Remove from the oven and let cool on a rack.


Wednesday, October 12, 2011

BBQ Meatballs aka. Sweet & Sour Meatballs

These are a delicious variation on the sweet and sour meatball theme. They taste a bit more on the bbq side than the pineapple version of sweet and sour. My family LOVES these over brown rice!
**Pictures to come**


1 to 1 1/2 lbs lean ground beef
3/4 C. rolled oats
2 eggs, slightly beaten
1/2 C. finely chopped onion
1/2 C. milk
1 tsp. salt
few grains pepper
1 tsp. Worcestershire sauce

Combine all ingredients and mix well. Form into about 12 meatballs, each about 1 1/2 to 2 inches in diameter. Place in a casserole dish. Cover with sauce below and bake at 350 for about 25-30 minutes. Makes 6-8 servings, 2 meatballs each.

Sauce
1/2 C. brown sugar
1/4 C. vinegar
1 tsp. prepared mustard (I like dijon)
1/4 C. barbeque sauce
1 tsp. Worcestershire sauce

Combine all ingredients in a saucepan and heat until sugar is dissolved and ingredients are well blended.

Serve over rice! We like our meatballs extra saucy, so I usually make a double batch of meatballs (fits perfectly in a 9x13 pan) and make a triple batch of sauce! Enough for left overs! Yummy!

Tuesday, October 11, 2011

Swiss Apple Sandwich

These sandwiches are very quick/easy to make, and husband-approved. By at least one guy.

But they really are delicious and light and super fast to make. They would be great with sliced turkey or ham, too.

Swiss Apple Sandwich


Ingredients:
Swiss cheese (sliced)
1 apple (sliced)
1 c broccoli slaw
1 tbsp poppy seed dressing
Yummy bread (I used toasted french)

1. Mix together the poppy seed dressing and the broccoli slaw.
2. Assemble sandwiches. I like to go bread, swiss slices, slaw and then apples slices and the other piece of bread.
3. Enjoy!

Makes about 4-5 sandwiches.

Friday, October 7, 2011

Ginger Garlic Stir Fry

Hey all, I wanted to share a recipe that is my go-to for stir fry. It is seriously so easy, fresh and DELICIOUS. Even Chris loves it, and he's no stir fry fan. The secret is my special sauce that I use (eyebrow wiggle and wink).

I love this recipe because it's a good way to use up leftover veggies. I'll usually do this towards the end of the week, when I might have half a cabbage or a lone red pepper leftover. It's filling and satisfying and perty cheap!

Ingredients:

1 c sliced veggies/serving; onions and carrots are always a MUST, and then I like to add broccoli, peppers, cabbage as I have them. If I'm feeling lazy, I sometimes use a frozen stir fry veggie mix.
1/2 c of protein; I usually use tofu, but beef or chicken would be great
1 cup cooked rice/serving
1 recipe of the sauce found below
1 T cooking oil

Ahem. So what I usually do is prepare the sauce below, then I'll marinate my tofu in the sauce. Tofu holds flavors wonderfully. Then I'll throw about a tablespoon of oil in a frying pan and cook it until it's nice and crispy on all sides. If you use tofu, save the marinade; with raw meat, this might be unsafe, so you may have to make more sauce.

Then, I'll remove my tofu from the pan and start cooking the veggies in the same pan (you can use 2 separate pans so you could cook your protein/veggies at the same time), adding a little oil if needed. When they are getting close to how I like them I will throw in the sauce I used to marinate the tofu and let the veggies soak it up a little, for about 3 minutes. Then I pull it off the heat. To eat I usually pull a cup of rice and then top it with the veggies/tofu. Delicious, healthy, and fast.

Sauce:
It's mind blowing how easy this sauce is to make—and how good it turns out. And I like to use it because I know what's in it, unlike Bragg's or other bottled teriyaki sauces that can have preservatives or high fructose corn syrup in them (yuck).

1/4 c soy sauce
1 c water
2 cloves garlic, minced (more if you like garlic)
1 tbl minced fresh ginger
1 t sugar (optional)
1 tbl corn starch

Mix the soy sauce, garlic, ginger, and sugar together in a small bowl, reserving a 1/4 water. Mix the water with the corn starch until it is dissolved, and pour into sauce. Easy peasy :)!

Sunday, September 25, 2011

MexiMeat Mix

MexiMeat Mix is delicious and is adapted from the Mexican Meat Mix recipe in the "Make-a-Mix" Cookbook. It is a mix and is intended to be made in bulk and then frozen in meal-size portions.

We mostly use this meat to make delicious burritos by adding black beans to the meat, then placing that mixture on a tortilla with cheese, sour cream, guacamole, tomatoes, salsa, and lettuce. It can also be used to make nachos, enchiladas, or taco salad.

Here's the recipe:

5 lb. beef roast or combination of beef and pork roasts

3 onions, chopped (I used 2)

1 (4 oz.) can chopped green chilies

2 (7 oz.) cans green-chile salsa

1/4 tsp. garlic powder

4 Tbsp. all-purpose flour

1-2 tsp. salt (I start with 1 tsp. but usually add close to 2 tsp.--to taste)

1 tsp. ground cumin

Directions:

Place roast, chopped onions, green chilies, and green chile salsa in a crock pot. Cook on low 8-10 hours or high 4-6 hours. Drain meat, reserving juices. Cool meat, then remove bones (if you used a bone-in roast) and shred the meat and set aside.

Add 3/4 of the reserved cooking juices to a large stock pot. Add garlic powder, flour, 1 tsp. salt, and cumin. Cook over medium heat for 5 minutes until mixture bubbles. Cook one minute more. Add shredded meat. Stir and add additional salt to taste. Add more of the reserved juice, if needed, to reach desired consistency. Set aside to cool enough to freeze.

Put about 2-3 cups cooled meat mix into 1-quart freezer bags or freezer containers, leaving 1/2-inch space at the top. Seal and label with date and contents. Freeze and use within 6 months.


I used a large pork shoulder butt roast this time (it had a couple bones). Beef roasts are also great, a combination of the two is good, too.


Here are the onions, green chile salsa, and green chilies I used.


It's all in the crock pot and ready to cook! (4 hours on high this time)


Shredding the meat after it's cooked and slightly cool.


A close-up of the meat shredding. Just get two forks in there and pull the meat apart!


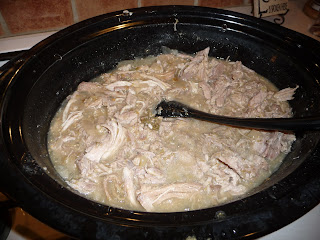
This is how the meat looks when it's shredded.


The juices and flour ready to simmer.


Last time I made this, I needed all the juice. So, I poured it all in this time. I should've done as my directions above indicated and started with 3/4 of the liquid (I added those directions due to this experience). This meat turned out a bit juicier than I prefer.


My bags of meat ready to go into the freezer to provide delicious, easy to prepare meals!

Posted by Picasa

Tuesday, August 2, 2011

Lemon Garlic Dressing (for Quinoa)

I was very excited to try this dressing because of the recommendation to pour it over quinoa (keen-wah). For a long time, I've wanted to find some new ways to use quinoa.

What is quinoa, you ask? Quinoa is an ancient South American grain. It is high in protein and quite nutritious. It has a bitter outer layer, though, so you must rinse it well before cooking it. Cooking quinoa is much like cooking rice. To cook 1 cup quinoa, bring 2 cups water to a boil. Stir in 1 cup well-rinsed quinoa (I use a mesh strainer to do this), turn heat to low and put a lid on the pan and allow it to cook for 20 minutes or until there are little white lines/curls coming off each quinoa grain.


Lemon Garlic Dressing

(Recipe found in the Vitamix Cookbook--they say "Pour over couscous, quinoa or use as a salad dressing.")


1 lemon, peeled, halved, seeded (or you could juice it)

1/2 tsp. hot sauce (I used Frank's)

2 garlic cloves, peeled

1/2 tsp. paprika

1/4 tsp. cumin

1 tsp. salt (I used a little less)

1/3 cup olive oil

If using a vitamix, combine all ingredients, except olive oil, into Vitamix container in order listed. Select variable 1 and turn machine on. Quickly increase speed to variable 10, then to high. Blend for 1 minute, using tamper to press the ingredients into the blades. Reduce speed to variable 7 and remove the lid plug. While machine is running, slowly pour in oil through the lid plug opening. Blend for 20 seconds. Serve.

If not using a Vitamix, combine all ingredients in a small food processor, or using a hand blender, or mix in a regular blender. If you juice your lemon, you could simply whisk all the ingredients until well combined.

I thought this dressing was delicous poured over quinoa like this (I think next time, I'll add some stir-fried onions, carrots, and celery to it):


This time, it was even better with black beans on top. I think quinoa and black beans are a spectacular food pairing. This was my dinner entree the other night.


Posted by Picasa

Thursday, April 7, 2011

Stovetop Mac N' Cheese


This recipe is easy peesy mac n' cheesy! Everyone loves macaroni & cheese, it is just delicious comfort food. My family loves homemade mac n' cheese, so I was so excited when I found this recipe you could make on the stove top in just a little more time than the stuff in the box. This recipe was adapted from The America's Test Kitchen Family Cookbook.

1 lb. macaroni
4 eggs
salt
2 (12 oz.) cans evaporated milk
1 tsp. dry mustard (dissolved in 1 tsp. water)
1/4-1/2 tsp. hot sauce (Frank's)
pepper
1/2 C. butter (1 stick)
1-1 1/2 lb. cheddar cheese, shredded (4-6 C.)

Boil water in a large pot for the macaroni, salt the water (2 tsp.) and add the macaroni. Boil the macaroni until almost done, still a little firm as it will keep cooking while making the sauce. While that is boiling, mix together the eggs, 1 can milk, the mustard mixture, hot sauce, 1 tsp. salt, and 1/2 tsp. pepper in a bowl.
Drain the pasta and return it to the pot. Set the pot over low heat and stir in the butter until melted. Then stir in the egg mixture and half of the cheese. Continue to cook over low heat gradually adding the remaining cheese and some milk until the mixture is hot and creamy (I often have 1/2 C. milk left over). It usually takes about 5-6 minutes to heat through.
Season with salt, pepper to taste. We (as in Steve and I) love to add a little extra Frank's sauce too! Yummy!

For those who love the crunchy topping on baked mac n' cheese crumble crackers on top of your bowl (ritz are good). I LOVE sharp cheddar cheese in this recipe. It would also be a lot of fun to mix it up with a couple different kinds of cheese: Monterey Jack or Colby. Whatever you like! Get really wild and make 3 cheese macaroni!!