Saturday, October 25, 2008

Flat Pancakes aka. Swedish Pancakes!

2 eggs
1 tsp. sugar
1/2 tsp. salt
1 C. flour
1 C. milk
1/4 C. butter

1 C. water


Beat eggs in large bowl; add sugar and salt. Add 1/2 cup milk and 1/2 flour; beat smooth (use electric mixer). Add remaining flour and milk; beat smooth. Melt butter; add to mixture. Beat again to mix. Add water and mix.


I'm not sure this picture is helpful, but the batter will look quite runny after you add the water.

Heat a large electric skillet to 380 degrees. (Best to have a skillet with a handle on it) Spray with Pam. Scoop 1/3 - 1/2 C. batter into hot pan and tip pan immediately to completely cover bottom of pan. Cook until edges turn dark brown, then turn with pancake turner and brown on the other side.

*Note: I cannot find an electric skillet with a handle anywhere. Grandma said she had to special order hers 10 years ago! So I just use my non-stick skillets on the stove. It took a couple of times to figure out exactly where to put my knob to get my heat right. So, I have included a few pictures of the pancakes in hopes that it will help you to know what they should look like.
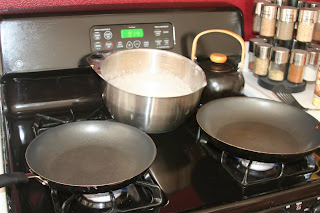

This is my stove set-up so I can cook two at a time!

This is what I like mine to look like!


Steve prefers his like this!

Place on warm plate; sprinkle with sugar. Roll them into a cylinder and eat.


I have two plates next to the stove so I can flip the pancakes onto them. Steve sprinkles the sugar on and rolls them while I start on the next two!


The final product!
We fold ours in half so the sugar doesn't fall out the bottom!


Most people like to eat these with their fingers . . . the children certainly do! They are also good spread with jam. Please do not confuse these with crepes, they are not the same.


This recipe is from Steve's maternal grandma, Aleen Madsen. The very first time I stayed with her in Bountiful, UT (while Steve and I were still dating) she made us these for breakfast. We've had them every time we've been back! Steve remembers sitting around with all his siblings and cousins devouring grandma's flat pancakes. We love them at our house too! They are Byron's most requested breakfast, sometimes even a Sunday night dinner! We hope you enjoy them as much as we do!

As a final note we always double this recipe for my little family. There is usually just enough batter left for Steve to cook some up the next day for his breakfast.

Friday, October 24, 2008

Cobb Salad

Every time I make this, I wonder why I don't do so more often. My children even loved it when I made it a couple weeks ago.

Romaine lettuce, washed and chopped
Tomato, diced
Carrot, grated
Cucumber, sliced
Avocado, diced
Bacon, cooked and crumbled
Turkey, chopped
Cheddar cheese, grated
Hard boiled eggs (1 per person)
Croutons
Ranch or Blue Cheese Dressing

Toss first four ingredients together. Arrange remaining ingredients in bowls or on a plate. People can assemble their salad with what they like on it, and the leftover cheese, avocado, and croutons won't go bad in any leftover salad. Other optional ingredients: thin slices red onion, corn, celery, etc.

Spinach-Stuffed Chicken


I got this recipe from my friend, Tara Smith, who calls this Easy Chicken Cordon Blue. Because I'm so particular about things sometimes, I couldn't stick with that name because this recipe is so different from traditional Chicken Cordon Blue. It is delicious, though!

4 boneless skinless chicken breasts seasoned with salt and pepper
2 handfuls chopped spinach (fresh is best)
zest of one lemon
4-5 ounces of blue cheese crumbles
1 clove garlic, finely chopped
4 slices uncooked bacon

Insert a knife into the fat end of each seasoned chicken breast and twist to make a "pocket" for the stuffing. Set aside. In a bowl, mix together spinach, lemon zest, blue cheese, and garlic.
Shove spinach stuffing into the "pocket" you made in each chicken breast. Wrap each breast with a piece of bacon and place on a cookie sheet. Bake in oven at 425 degrees for 20-30 minutes, or as long as it takes for the bacon to crisp and the chicken to cook through.

Cinnamon Rolls


This is the recipe for a single batch--I double it every time, which makes two 9X13 pans with 12-15 cinnamon rolls in each.

4-4 1/2 cups all-purpose flour
2 1/4 tsp. yeast
1 cup milk
1/3 cup sugar
1/3 cup butter or margarine
1/2 tsp. salt
2 eggs
3 Tbsp. butter or margarine, melted
1/2 cup sugar
2 tsp. cinnamon

In a large mixing bowl or Bosch (or similar) mixer, combine 2 cups of the flour and yeast; set aside. In a medium saucepan heat and stir milk, the 1/3 cup sugar, the 1/3 cup butter, and salt just till warm and butter almost melts. Add milk mixture to dry mixture along with eggs. Beat on low to medium speed 30 seconds, scraping bowl. Beat on high speed 3 minutes. Mix in remaining flour. When it comes to adding the last cup (or two if you're doubling this recipe), add the flour slowly. The dough should be sticking to the sides of the bowl some but also not be too sticky. It should look like this:


Allow dough to knead for 5 minutes after the correct consistency has been reached. Cover with a damp cloth and allow it to rise until doubled in size (30-60 minutes), like this:


Beat down the dough. Turn out onto a floured surface. Let rest for 5-10 minutes. Prepare melted butter and cinnamon sugar. If you made a double batch, divide dough in half. Roll dough into a rectangle that is 1/4 inch thick. Spread with melted butter and sprinkle with cinnamon sugar:

Starting at the wide side, roll into a cylinder, pinching the edges of the dough onto itself. It should look like this:


Next, cut roll into 1-inch thick cinnamon rolls


Place in a greased pan with some space around them.


Cover again with the damp cloth and allow to rise for about 30 minutes (this is key--sometimes I want to reduce this rising time because I can hardly wait to bake and eat them, but they have a much better texture if you're patient and wait until they look like this):


Bake in a 375-degree oven for 15-20 minutes or till golden. Allow to cool for at least 20 minutes, then frost with this frosting recipe (I think it’s very close to Cinnabon’s frosting):

Ingredients:
1/2 lb. butter
1/2 lb. cream cheese
1 lbs. powdered sugar
1 tsp. lemon juice
1 tsp. vanilla extract

Preparation Instructions:
Allow butter and cream cheese to reach room temperature. Beat cream cheese and butter together in a bowl with a mixer. Slowly add in all powdered sugar. Once all of the sugar is in the bowl, mix for at least an additional 12 minutes. When almost done, add in the extracts. Enjoy!

Kristin’s note: The above ingredient amounts for the frosting are cut in half. The original would make a HUGE amount (it called for 1 lb. of margarine and cream cheese, etc.). Even if you only make half of the above recipe, it could cover 2-3 batches of the cinnamon rolls. If you don’t want any leftover, you might want to cut the above amounts in half. I wouldn’t store the frosting for more than a week. I did, and the frosting was still good, but not as tasty as it was when it was fresh.


To make the cinnamon rolls into a wreath (a family Christmas morning tradition), roll up the dough jelly-roll style as usual. With a good, serrated knife, make cuts in the roll, 1 inch apart, but don’t cut it all the way through (just almost all the way through.) You will end up with a segmented jelly roll. Carefully lift the roll to a cookie sheet (or, if you are giving it away, you can bake it on a square of cardboard covered with foil--which should be sprayed with cooking spray). Attach the two ends of the roll to make a circle, and seal the dough together. Arrange the dough in an attractive manner and let raise according to the directions in the recipe (until doubled). The middle of the roll often takes the longest to cook. You can place a piece of foil over the top midway through baking to prevent the top from burning before the middle of the wreath is done. Or, you can cut the cinnamon roll as normal and simply arrange the rolls in a circle to form a wreath (as you would to display cookies, etc.). I did this for the first time last Christmas, and it worked quite well. It seems to bake more evenly that way. It looks like this:

Sunday, October 19, 2008

Caramel Apples

1 pkg. Kraft Caramels, unwrapped
2 Tbsp. water
5 Granny Smith or Braeburn Apples, washed and dried well
5 popsicle sticks (they usually come in the Kraft Caramels bag)

In a medium-sized pan, warm caramel and water over medium-low heat, stirring constantly. Place waxed paper with butter rubbed on it on a large plate. Hold each apple by the stick and place in the pan of caramel. Using a spoon, drizzle caramel over the apple to coat. Lift apple and scrape the caramel off the bottom of the apple. Place caramel-coated apples on a plate. Put the plate in the refrigerator for one hour or until ready to serve.

This picture is called "Apples in My Apron." Fun, huh?

The finished product (this batch wasn't the greatest--the caramel got a little scorched, which is why there are darker caramel specks on the apples. They were still good). YUM!